目录
1.技术栈:
2.模块介绍:
3.关键代码讲解
3.1基础公共模块(common)依赖:
3.3授权模块(auth)依赖:
3.4授权模块核心配置类(AuthrizatonConfig):
3.4 SecurityConfig.java
3.5 bootstrap的核心配置文件(其他服务配置类似这个):
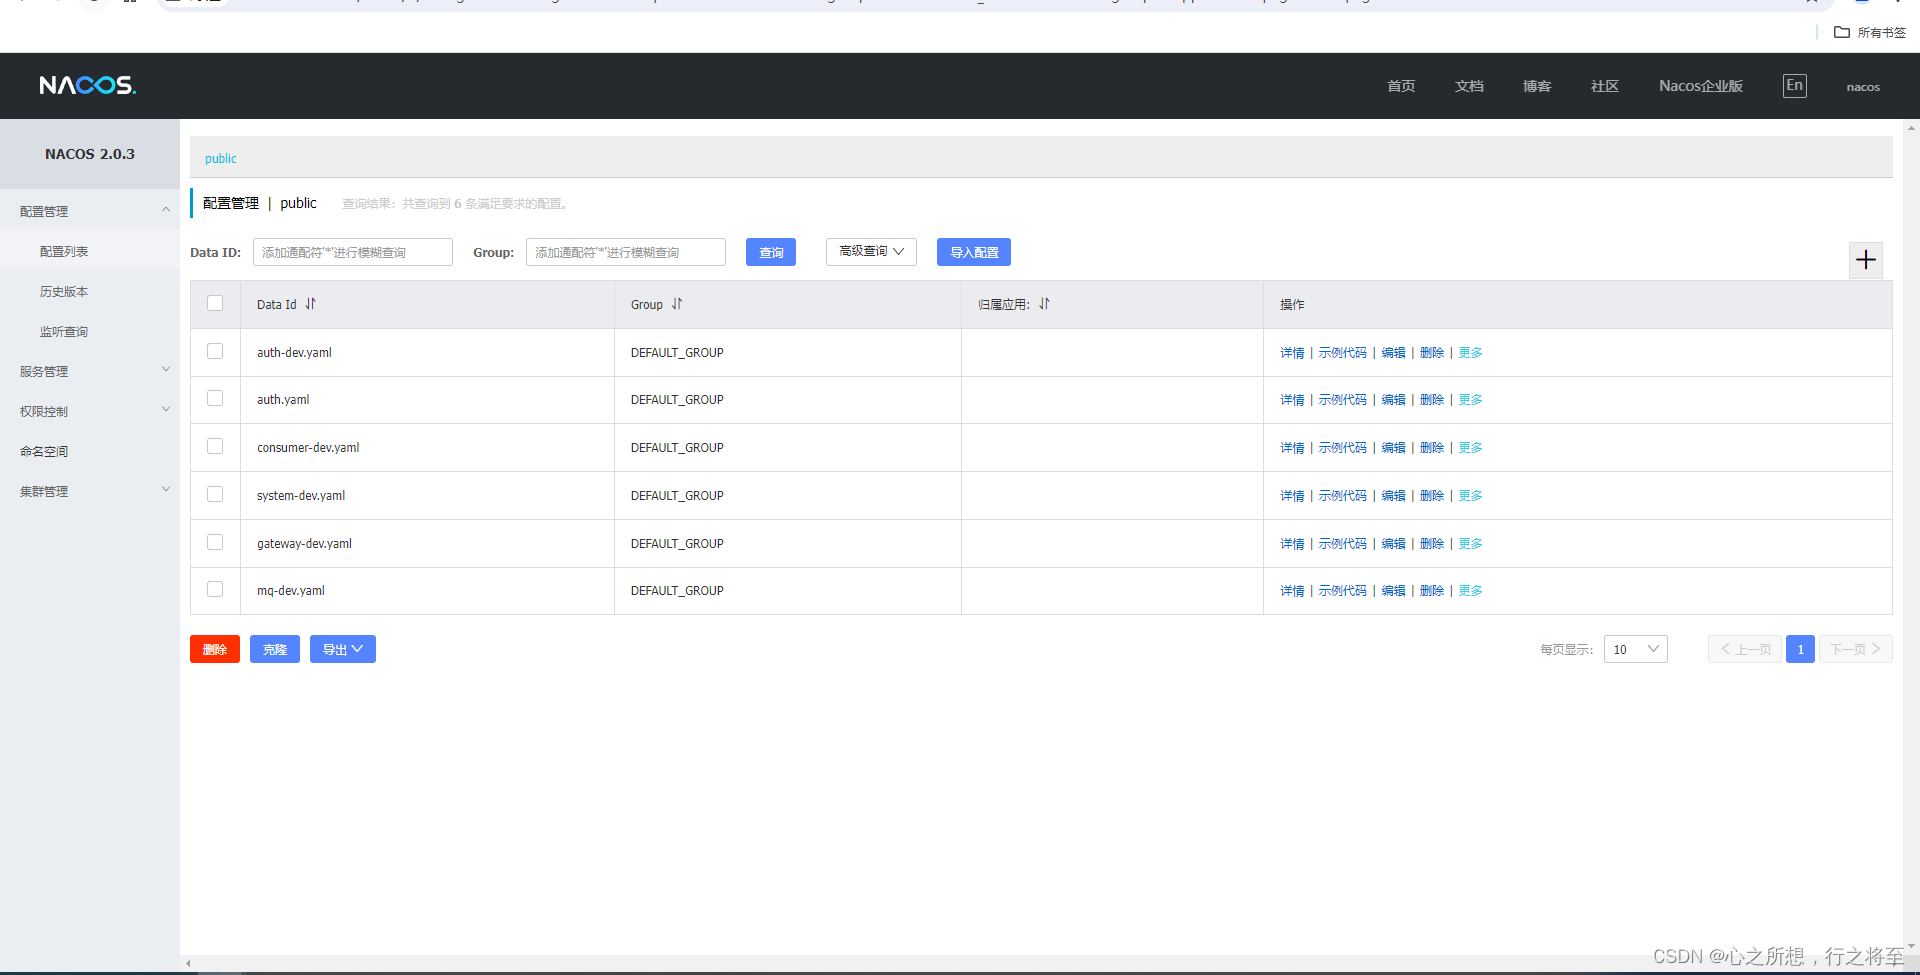
3.6nacos上面的配置文件如auth-dev.yaml
3.7 consumer-dev.yaml
3.8 gateway-dev.yaml:
3.9mq-dev.yaml:
4.授权认证模块演示:
4.1获取到授权码:
4.2 通过postman请求获取access_token
4.2测试通过access_token访问资源:
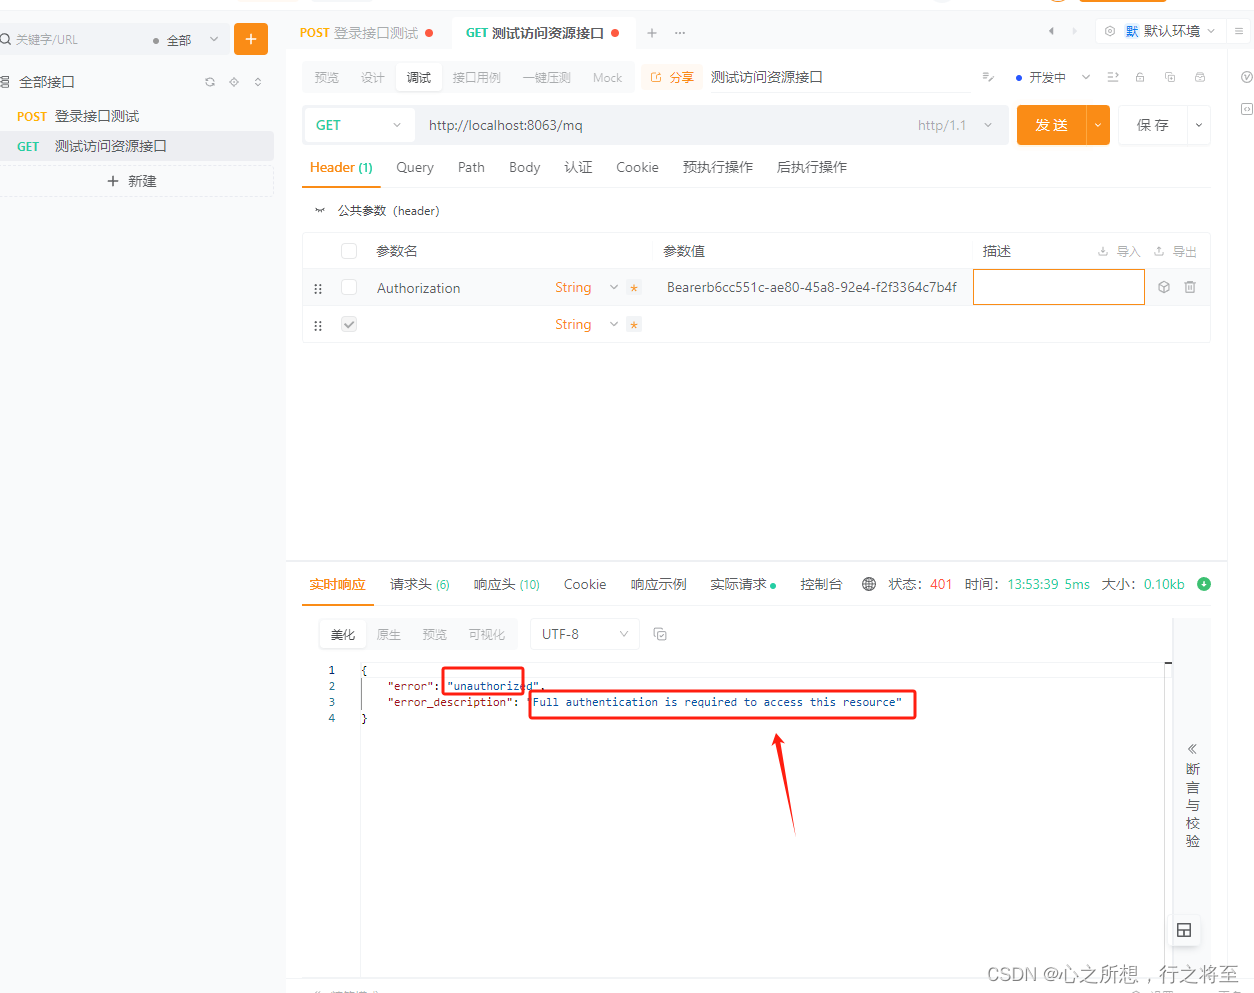
4.3 无token携带的时候,访问服务资源
4.4 在指定模块添加配置类(ResourceServerConfig):
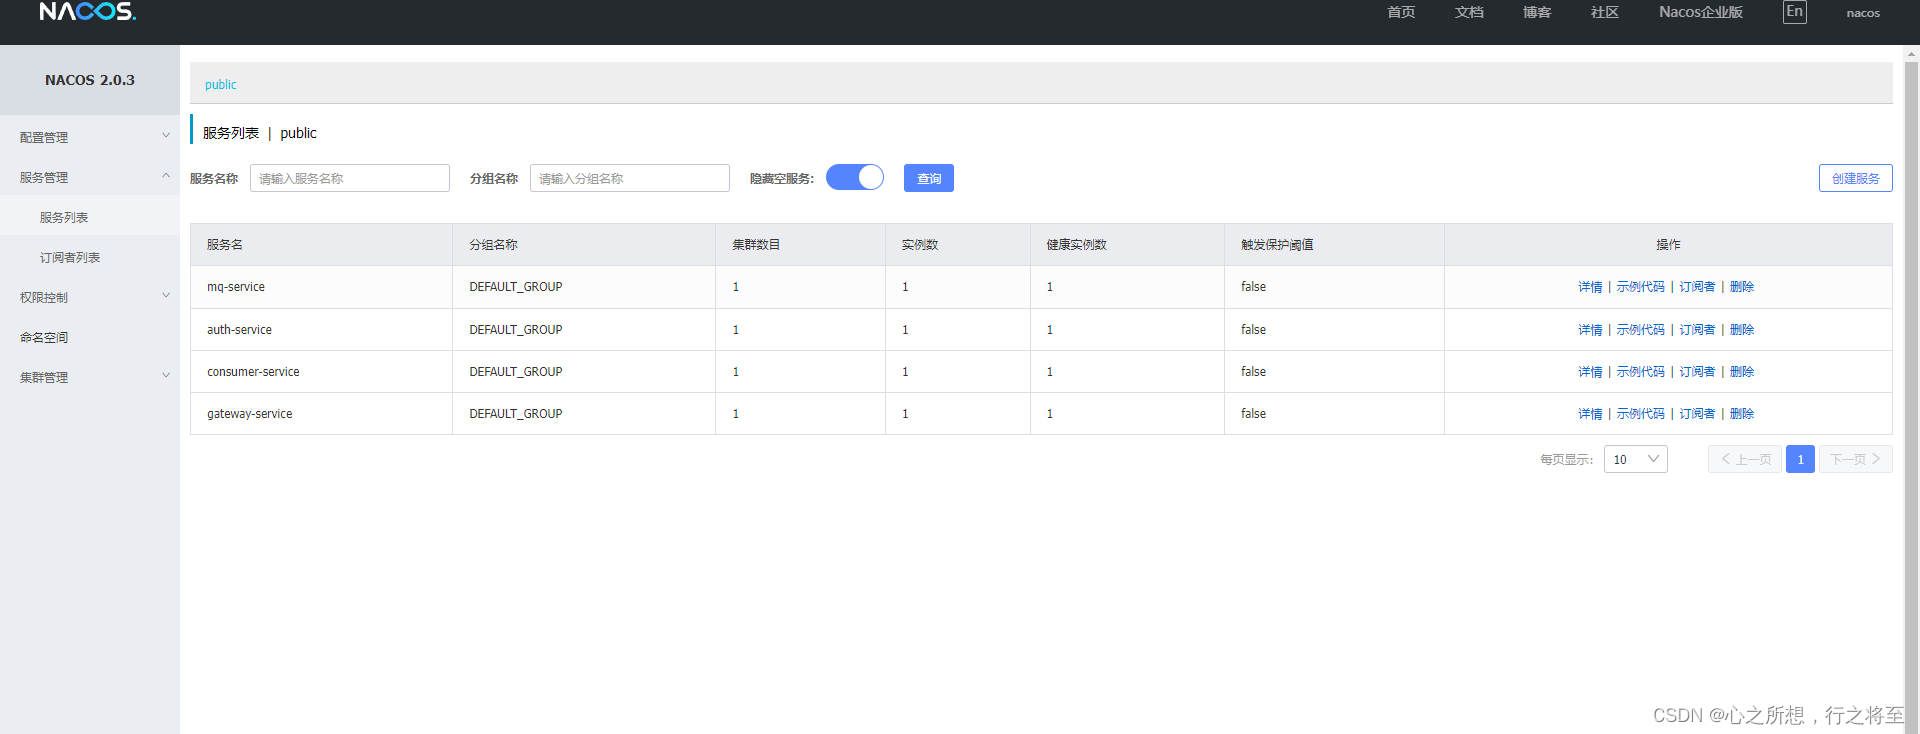
5.nacos相关配置,以及服务注册情况
5.1nacos配置显示:
5.2 nacos上服务显示:
1.技术栈:
SpringCloud 微服务基础架构
1.1.nacos 用于服务的注册,作为注册中心,同时也利用了nacos的热更新特点,使用nacos作为配置中心。
1.2.Mysql 主要用了mqsql8.0版本,mysql作为关系型数据库的存储
1.3.MybatisPlus 主要使用了MybatisPlu实现对mysql数据库的操作,实现增删改查。
1.4.Oauth2.0 主要使用ouath2.0实现微服务的授权认证登录。
1.5.消息队列 rabbitMQ,应对物联网设备数据并发的中间件,对设备数据进行排队处理
1.6.emqx 主要用于设备的mqtt连接
2.模块介绍:
2.1.auth模块:主要是集成了数据库的连接,以及ouath 的授权认证功能。
2.2.common模块:作为公共模块,为其他模块提供基础类以及公共依赖,降低代码的耦合度
2.3.consumer模块:消费者模块,主要用于消费rabbitmq产生的数据信息。
2.4.mq模块:主要用于设备处理设备上报的数据。
2.5.gateway模块:主要作为接口请求统一入口,做链路追踪,以及拦截请求。
2.6.system模块:后台管理平台业务开发模块。
代码结构示意图:

3.关键代码讲解
3.1基础公共模块(common)依赖:
<?xml version="1.0" encoding="UTF-8"?>
<project xmlns="http://maven.apache.org/POM/4.0.0" xmlns:xsi="http://www.w3.org/2001/XMLSchema-instance"
         xsi:schemaLocation="http://maven.apache.org/POM/4.0.0 https://maven.apache.org/xsd/maven-4.0.0.xsd">
    <modelVersion>4.0.0</modelVersion>
    <parent>
        <groupId>org.springframework.boot</groupId>
        <artifactId>spring-boot-starter-parent</artifactId>
        <version>2.3.2.RELEASE</version><!-- lookup parent from repository -->
    </parent>
    <groupId>com.example</groupId>
    <artifactId>common</artifactId>
    <version>0.0.1-SNAPSHOT</version>
    <name>common</name>
    <description>Demo project for Spring Boot</description>
    <url/>
    <licenses>
        <license/>
    </licenses>
    <developers>
        <developer/>
    </developers>
    <scm>
        <connection/>
        <developerConnection/>
        <tag/>
        <url/>
    </scm>
    <properties>
        <java.version>8</java.version>
    </properties>
    <dependencies>
        <dependency>
            <groupId>org.springframework.cloud</groupId>
            <artifactId>spring-cloud-dependencies</artifactId>
            <version>Hoxton.SR8</version>
            <type>pom</type>
            <scope>import</scope>
        </dependency>

        <dependency>
            <groupId>org.springframework.cloud</groupId>
            <artifactId>spring-cloud-starter-bootstrap</artifactId>
            <version>3.0.0</version>
        </dependency>

        <dependency>
            <groupId>com.alibaba.cloud</groupId>
            <artifactId>spring-cloud-starter-alibaba-nacos-discovery</artifactId>
            <version>2.2.5.RELEASE</version>
        </dependency>
        <dependency>
            <groupId>com.alibaba.cloud</groupId>
            <artifactId>spring-cloud-starter-alibaba-nacos-config</artifactId>
            <version>2.2.5.RELEASE</version>
        </dependency>

        <!-- mybatis-plus -->
        <dependency>
            <groupId>com.baomidou</groupId>
            <artifactId>mybatis-plus-boot-starter</artifactId>
            <version>3.4.2</version>
        </dependency>

        <!-- mysql -->
        <dependency>
            <groupId>mysql</groupId>
            <artifactId>mysql-connector-java</artifactId>
        </dependency>

        <!-- lombok -->
        <dependency>
            <groupId>org.projectlombok</groupId>
            <artifactId>lombok</artifactId>
            <optional>true</optional>
        </dependency>
          <!--阿里巴巴数据库连接池-->
        <dependency>
            <groupId>com.alibaba</groupId>
            <artifactId>druid-spring-boot-starter</artifactId>
            <version>1.2.8</version>
        </dependency>


        <dependency>
            <groupId>org.springframework.boot</groupId>
            <artifactId>spring-boot-starter</artifactId>
        </dependency>

        <dependency>
            <groupId>org.springframework.boot</groupId>
            <artifactId>spring-boot-starter-web</artifactId>
        </dependency>
        <dependency>
            <groupId>org.springframework.boot</groupId>
            <artifactId>spring-boot-starter-aop</artifactId>
        </dependency>
        <dependency>
            <groupId>org.springframework.boot</groupId>
            <artifactId>spring-boot-starter-test</artifactId>
            <scope>test</scope>
        </dependency>
    </dependencies>

    <build>
        <plugins>
            <plugin>
                <groupId>org.springframework.boot</groupId>
                <artifactId>spring-boot-maven-plugin</artifactId>
            </plugin>
        </plugins>
    </build>

</project>
3.2网关相关依赖:
<?xml version="1.0" encoding="UTF-8"?>
<project xmlns="http://maven.apache.org/POM/4.0.0" xmlns:xsi="http://www.w3.org/2001/XMLSchema-instance"
         xsi:schemaLocation="http://maven.apache.org/POM/4.0.0 https://maven.apache.org/xsd/maven-4.0.0.xsd">
    <modelVersion>4.0.0</modelVersion>
    <parent>
        <groupId>org.springframework.boot</groupId>
        <artifactId>spring-boot-starter-parent</artifactId>
        <version>2.3.2.RELEASE</version>
     <!-- lookup parent from repository -->
    </parent>
    <groupId>com.example</groupId>
    <artifactId>gateway</artifactId>
    <version>0.0.1-SNAPSHOT</version>
    <name>gateway</name>
    <description>Demo project for Spring Boot</description>
    <url/>
    <licenses>
        <license/>
    </licenses>
    <developers>
        <developer/>
    </developers>
    <scm>
        <connection/>
        <developerConnection/>
        <tag/>
        <url/>
    </scm>
    <properties>
        <java.version>8</java.version>
    </properties>
    <dependencies>
        <dependency>
            <groupId>com.example</groupId>
            <artifactId>common</artifactId>
            <version>0.0.1-SNAPSHOT</version>
            <exclusions>
                <exclusion>
                    <groupId>org.springframework.boot</groupId>
                    <artifactId>spring-boot-starter-web</artifactId>
                </exclusion>
            </exclusions>
        </dependency>
      <!--  网关配置-->


        <!--网关发现服务后,进行负载均衡的转发调用-->
      <!--  <dependency>
            <groupId>org.springframework.cloud</groupId>
            <artifactId>spring-cloud-starter-loadbalancer</artifactId>
            <version>3.1.2</version>
        </dependency>-->
        <!--网关核心依赖-->
        <dependency>
            <groupId>org.springframework.cloud</groupId>
            <artifactId>spring-cloud-starter-gateway</artifactId>
            <version>2.2.10.RELEASE</version>
            <exclusions>
                <exclusion>
                    <groupId>io.projectreactor.netty</groupId>
                    <artifactId>reactor-netty</artifactId>
                </exclusion>
            </exclusions>
        </dependency>
        <!--版本冲突报错指定reactor-netty、spring-webflux版本-->
        <dependency>
            <groupId>org.springframework</groupId>
            <artifactId>spring-webflux</artifactId>
            <version>5.2.7.RELEASE</version>
        </dependency>
        <dependency>
            <groupId>io.projectreactor.netty</groupId>
            <artifactId>reactor-netty</artifactId>
            <version>0.9.14.RELEASE</version>
        </dependency>

        <dependency>
            <groupId>org.springframework.boot</groupId>
            <artifactId>spring-boot-starter</artifactId>
        </dependency>

        <dependency>
            <groupId>org.springframework.boot</groupId>
            <artifactId>spring-boot-starter-test</artifactId>
            <scope>test</scope>
        </dependency>
    </dependencies>

    <build>
        <plugins>
            <plugin>
                <groupId>org.springframework.boot</groupId>
                <artifactId>spring-boot-maven-plugin</artifactId>
            </plugin>
        </plugins>
    </build>

</project>
3.3授权模块(auth)依赖:
<?xml version="1.0" encoding="UTF-8"?>
<project xmlns="http://maven.apache.org/POM/4.0.0" xmlns:xsi="http://www.w3.org/2001/XMLSchema-instance"
         xsi:schemaLocation="http://maven.apache.org/POM/4.0.0 https://maven.apache.org/xsd/maven-4.0.0.xsd">
    <modelVersion>4.0.0</modelVersion>
    <parent>
        <groupId>org.springframework.boot</groupId>
        <artifactId>spring-boot-starter-parent</artifactId>
        <version>2.3.2.RELEASE</version>
       <!-- lookup parent from repository -->
    </parent>
    <groupId>com.example</groupId>
    <artifactId>auth</artifactId>
    <version>0.0.1-SNAPSHOT</version>
    <name>auth</name>
    <description>Demo project for Spring Boot</description>
    <url/>
    <licenses>
        <license/>
    </licenses>
    <developers>
        <developer/>
    </developers>
    <scm>
        <connection/>
        <developerConnection/>
        <tag/>
        <url/>
    </scm>


    <properties>
        <java.version>8</java.version>
    </properties>
    <dependencies>

        <dependency>
            <groupId>org.projectlombok</groupId>
            <artifactId>lombok</artifactId>
        </dependency>
        <dependency>
            <groupId>org.springframework.cloud</groupId>
            <artifactId>spring-cloud-starter-oauth2</artifactId>
            <version>2.2.5.RELEASE</version>
        </dependency>


        <dependency>
            <groupId>org.springframework.cloud</groupId>
            <artifactId>spring-cloud-starter-security</artifactId>
            <version>2.2.5.RELEASE</version>
        </dependency>
        <dependency>
            <groupId>org.springframework.boot</groupId>
            <artifactId>spring-boot-starter-data-redis</artifactId>
        </dependency>
        <dependency>
            <groupId>org.springframework.boot</groupId>
            <artifactId>spring-boot-starter-actuator</artifactId>
        </dependency>

     <!--   引入公共模块-->
        <dependency>
            <groupId>com.example</groupId>
            <artifactId>common</artifactId>
            <version>0.0.1-SNAPSHOT</version>
        </dependency>
     <!--引入数据库模块-->


        <dependency>
            <groupId>org.springframework.boot</groupId>
            <artifactId>spring-boot-starter</artifactId>
        </dependency>

        <dependency>
            <groupId>org.springframework.boot</groupId>
            <artifactId>spring-boot-starter-test</artifactId>
            <scope>test</scope>
        </dependency>
    </dependencies>

    <build>
        <plugins>
            <plugin>
                <groupId>org.springframework.boot</groupId>
                <artifactId>spring-boot-maven-plugin</artifactId>
            </plugin>
        </plugins>
    </build>

</project>
3.4授权模块核心配置类(AuthrizatonConfig):
package com.example.auth.config;

import org.apache.http.protocol.HTTP;
import org.springframework.beans.factory.annotation.Autowired;
import org.springframework.context.annotation.Bean;
import org.springframework.context.annotation.Configuration;
import org.springframework.http.HttpMethod;
import org.springframework.security.authentication.AuthenticationManager;
import org.springframework.security.crypto.bcrypt.BCryptPasswordEncoder;
import org.springframework.security.oauth2.config.annotation.configurers.ClientDetailsServiceConfigurer;
import org.springframework.security.oauth2.config.annotation.web.configuration.AuthorizationServerConfigurerAdapter;
import org.springframework.security.oauth2.config.annotation.web.configuration.EnableAuthorizationServer;
import org.springframework.security.oauth2.config.annotation.web.configurers.AuthorizationServerEndpointsConfigurer;
import org.springframework.security.oauth2.config.annotation.web.configurers.AuthorizationServerSecurityConfigurer;
import org.springframework.security.oauth2.provider.ClientDetailsService;
import org.springframework.security.oauth2.provider.code.AuthorizationCodeServices;
import org.springframework.security.oauth2.provider.code.InMemoryAuthorizationCodeServices;
import org.springframework.security.oauth2.provider.token.AuthorizationServerTokenServices;
import org.springframework.security.oauth2.provider.token.DefaultTokenServices;
import org.springframework.security.oauth2.provider.token.TokenStore;
import org.springframework.security.oauth2.provider.token.store.InMemoryTokenStore;
//访问授权地址获取授权码 http://localhost:8063/oauth/authorize?client_id=test&response_type=code&scope=all&redirect_uri=http://www.baidu.com
@Configuration
@EnableAuthorizationServer
public class AuthrizatonConfig  extends AuthorizationServerConfigurerAdapter {
    @Autowired
    private ClientDetailsService clientDetailsService;
    @Autowired
    private AuthenticationManager authenticationManager;
    @Override
    public void configure(AuthorizationServerSecurityConfigurer security) throws Exception {
       security//开启tokenkey权限访问
               .tokenKeyAccess("permitAll()")
               .checkTokenAccess("permitAll()")
               .allowFormAuthenticationForClients();
    }

    @Override
    public void configure(ClientDetailsServiceConfigurer clients) throws Exception {
      clients.inMemory()
              .withClient("test")
              .secret(new BCryptPasswordEncoder().encode("123456"))
              .resourceIds("auth","mq","gateway")
              .authorizedGrantTypes("authorization_code","password","client_credentials","implicit","refresh_token")
              .scopes("all")
              .autoApprove(false)
              .redirectUris("http://www.baidu.com");
    }

    /**
     * 令牌存储策略
     * @return
     */
    @Bean
    public TokenStore tokenStore(){
        return new InMemoryTokenStore();
    }

    @Bean
    public AuthorizationServerTokenServices tokenServices(){
        DefaultTokenServices services = new DefaultTokenServices();
        services.setSupportRefreshToken(true);
        services.setTokenStore(tokenStore());
        services.setAccessTokenValiditySeconds(60*60*60*2);
        services.setRefreshTokenValiditySeconds(60*60*24*3);
        return services;
    }

    public AuthorizationCodeServices authorizationCodeServices(){
        return  new InMemoryAuthorizationCodeServices();
    }

    @Override
    public void configure(AuthorizationServerEndpointsConfigurer endpoints) throws Exception {
        endpoints.authorizationCodeServices(authorizationCodeServices())
                .authenticationManager(authenticationManager)
                .tokenServices(tokenServices())
                .allowedTokenEndpointRequestMethods(HttpMethod.POST);

    }
}
3.4 SecurityConfig.java
package com.example.auth.config;

import org.springframework.context.annotation.Bean;
import org.springframework.context.annotation.Configuration;
import org.springframework.security.authentication.AuthenticationManager;
import org.springframework.security.config.annotation.authentication.builders.AuthenticationManagerBuilder;
import org.springframework.security.config.annotation.web.builders.HttpSecurity;
import org.springframework.security.config.annotation.web.builders.WebSecurity;
import org.springframework.security.config.annotation.web.configuration.EnableWebSecurity;
import org.springframework.security.config.annotation.web.configuration.WebSecurityConfigurerAdapter;
import org.springframework.security.crypto.bcrypt.BCryptPasswordEncoder;
import org.springframework.security.crypto.password.PasswordEncoder;

@Configuration
@EnableWebSecurity
public class SecurityConfig  extends WebSecurityConfigurerAdapter {

    /**
     * 密码加密
     * @return
     */
    @Bean
    PasswordEncoder passwordEncoder(){
        return new BCryptPasswordEncoder();
    }
    @Override
    protected void configure(AuthenticationManagerBuilder auth) throws Exception {

        auth.inMemoryAuthentication()
                .withUser("admin")
                .password(new BCryptPasswordEncoder()
                        .encode("123456"))
                .roles("admin");

    }
    @Override
    protected void configure(HttpSecurity http) throws Exception {
      //允许表单登录
        http.authorizeRequests()
                .anyRequest().authenticated()
                .and()
                .formLogin()
                .loginProcessingUrl("/login")
                .permitAll()
                .and()
                .csrf()
                .disable();
    }

    @Override
    @Bean
    public AuthenticationManager authenticationManagerBean() throws Exception {
        return super.authenticationManagerBean();
    }
}
3.5 bootstrap的核心配置文件(其他服务配置类似这个):
server:
  port: 8061
spring:
  application:
    name: auth
  profiles:
    active:
      dev
  cloud:
    nacos:
      config:
        file-extension: yaml
        #启用配置热更新功能
        refresh-enabled: true
        prefix: auth
      server-addr: 192.168.1.24:8848
      discovery:
        instance-enabled: true
        server-addr: 192.168.1.24:8848
        cluster-name: auth
        service: auth-service
3.6nacos上面的配置文件如auth-dev.yaml
spring:
    datasource:
        driver-class-name: com.mysql.cj.jdbc.Driver
        url: jdbc:mysql://localhost:3306/auth?serverTimezone=Asia/Shanghai&useUnicode=true&characterEncoding=utf-8&allowMultiQueries=true&nullCatalogMeansCurrent=true
        username: root
        password: Root@123
        type: com.alibaba.druid.pool.DruidDataSource
        druid:
            initial-size: 5
            min-idle: 1
            max-active: 10
            max-wait: 60000
            validation-query: SELECT 1 FROM DUAL
            test-on-borrow: false
            test-on-return: false
            test-while-idle: true
            time-between-eviction-runs-millis: 60000
mysql:
 driver: com.mysql.jdbc.driver
3.7 consumer-dev.yaml
spring:
    datasource:
        driver-class-name: com.mysql.cj.jdbc.Driver
        url: jdbc:mysql://localhost:3306/auth?serverTimezone=Asia/Shanghai&useUnicode=true&characterEncoding=utf-8&allowMultiQueries=true&nullCatalogMeansCurrent=true
        username: root
        password: Root@123
        type: com.alibaba.druid.pool.DruidDataSource
        druid:
            initial-size: 5
            min-idle: 1
            max-active: 10
            max-wait: 60000
            validation-query: SELECT 1 FROM DUAL
            test-on-borrow: false
            test-on-return: false
            test-while-idle: true
            time-between-eviction-runs-millis: 60000
3.8 gateway-dev.yaml:
spring:
  datasource:
        driver-class-name: com.mysql.cj.jdbc.Driver
        url: jdbc:mysql://localhost:3306/gateway?serverTimezone=Asia/Shanghai&useUnicode=true&characterEncoding=utf-8&allowMultiQueries=true&nullCatalogMeansCurrent=true
        username: root
        password: Root@123
        type: com.alibaba.druid.pool.DruidDataSource
        druid:
            initial-size: 5
            min-idle: 1
            max-active: 10
            max-wait: 60000
            validation-query: SELECT 1 FROM DUAL
            test-on-borrow: false
            test-on-return: false
            test-while-idle: true
            time-between-eviction-runs-millis: 60000
  cloud:
    gateway:
      globalcors: # 全局的跨域配置
      # 解决options请求被拦截问题
        add-to-simple-url-handler-mapping: true
               # options请求 就是一种询问服务器是否浏览器可以跨域的请求
               # 如果每次跨域都有询问服务器是否浏览器可以跨域对性能也是损耗
               # 可以配置本次跨域检测的有效期maxAge
               # 在maxAge设置的时间范围内,不去询问,统统允许跨域
        corsConfigurations:
          '[/**]':
            allowedOrigins:   # 允许哪些网站的跨域请求
              - "http://localhost:8061"
            allowedMethods:   # 允许的跨域ajax的请求方式
              - "GET"
              - "POST"
              - "DELETE"
              - "PUT"
              - "OPTIONS"
            allowedHeaders: "*"  # 允许在请求中携带的头信息
            allowCredentials: true # 允许在请求中携带cookie
            maxAge: 360000    # 本次跨域检测的有效期(单位毫秒)
      discovery:
        locator:
          enabled: true
      routes:
         #路由微服务名称,
        - id: auth-service
        #路由目标微服务 lb代表负载均衡协议
          uri: lb://auth-service
          #以请求路径做判断,只要符合匹配规则的请求就会被转发到上面信息对应的微服务中去  #路由断言,判断是否符合规则,符合规则路由到目标
          predicates:
            - Path=/auth/**,/search/**

        - id: consumer-service
          uri: lb://consumer-service
          predicates:
            - Path=/consumer/**
        - id: system-service
          uri: lb://system-service
          predicates:
            - Path=/system/**,/addresses/**
        - id: mq-service
          uri: lb://mq-service
          predicates:
            - Path=/mq/**
          #filters:                       # 过滤器,请求在传递过程中可以通过过滤器对其进行一定的修改# 转发之前去掉1层路径
            #- StripPrefix=1
      default-filters:            #默认过滤器,对请求进行处理
      #在请求头中添加信息,前键后值。
        - AddRequestHeader=headerName, project is well
3.9mq-dev.yaml:
mq: dsswaz
spring:
    datasource:
        driver-class-name: com.mysql.cj.jdbc.Driver
        url: jdbc:mysql://localhost:3306/auth?serverTimezone=Asia/Shanghai&useUnicode=true&characterEncoding=utf-8&allowMultiQueries=true&nullCatalogMeansCurrent=true
        username: root
        password: Root@123
        type: com.alibaba.druid.pool.DruidDataSource
        druid:
            initial-size: 5
            min-idle: 1
            max-active: 10
            max-wait: 60000
            validation-query: SELECT 1 FROM DUAL
            test-on-borrow: false
            test-on-return: false
            test-while-idle: true
            time-between-eviction-runs-millis: 60000
4.授权认证模块演示:
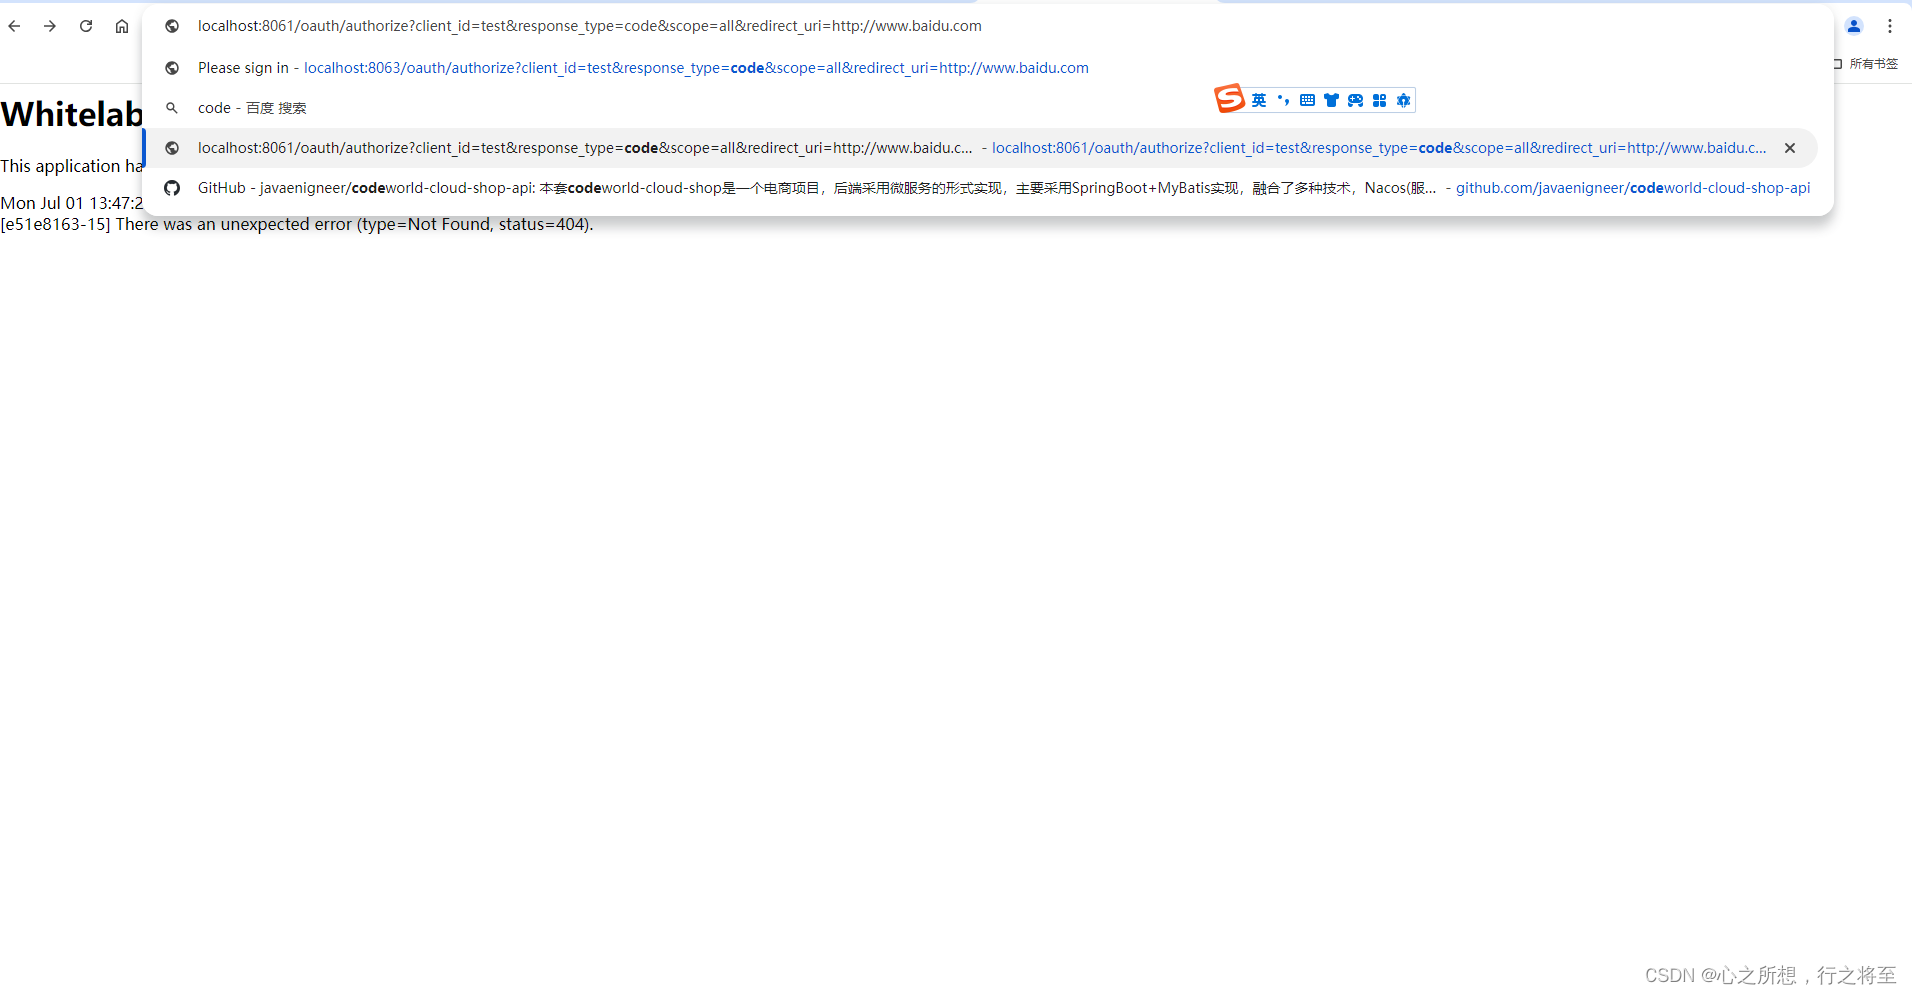
通过访问http://localhost:8061/oauth/authorize?client_id=test&response_type=code&scope=all&redirect_uri=http://www.baidu.com
地址获取code 输入账户 admin 密码:123456

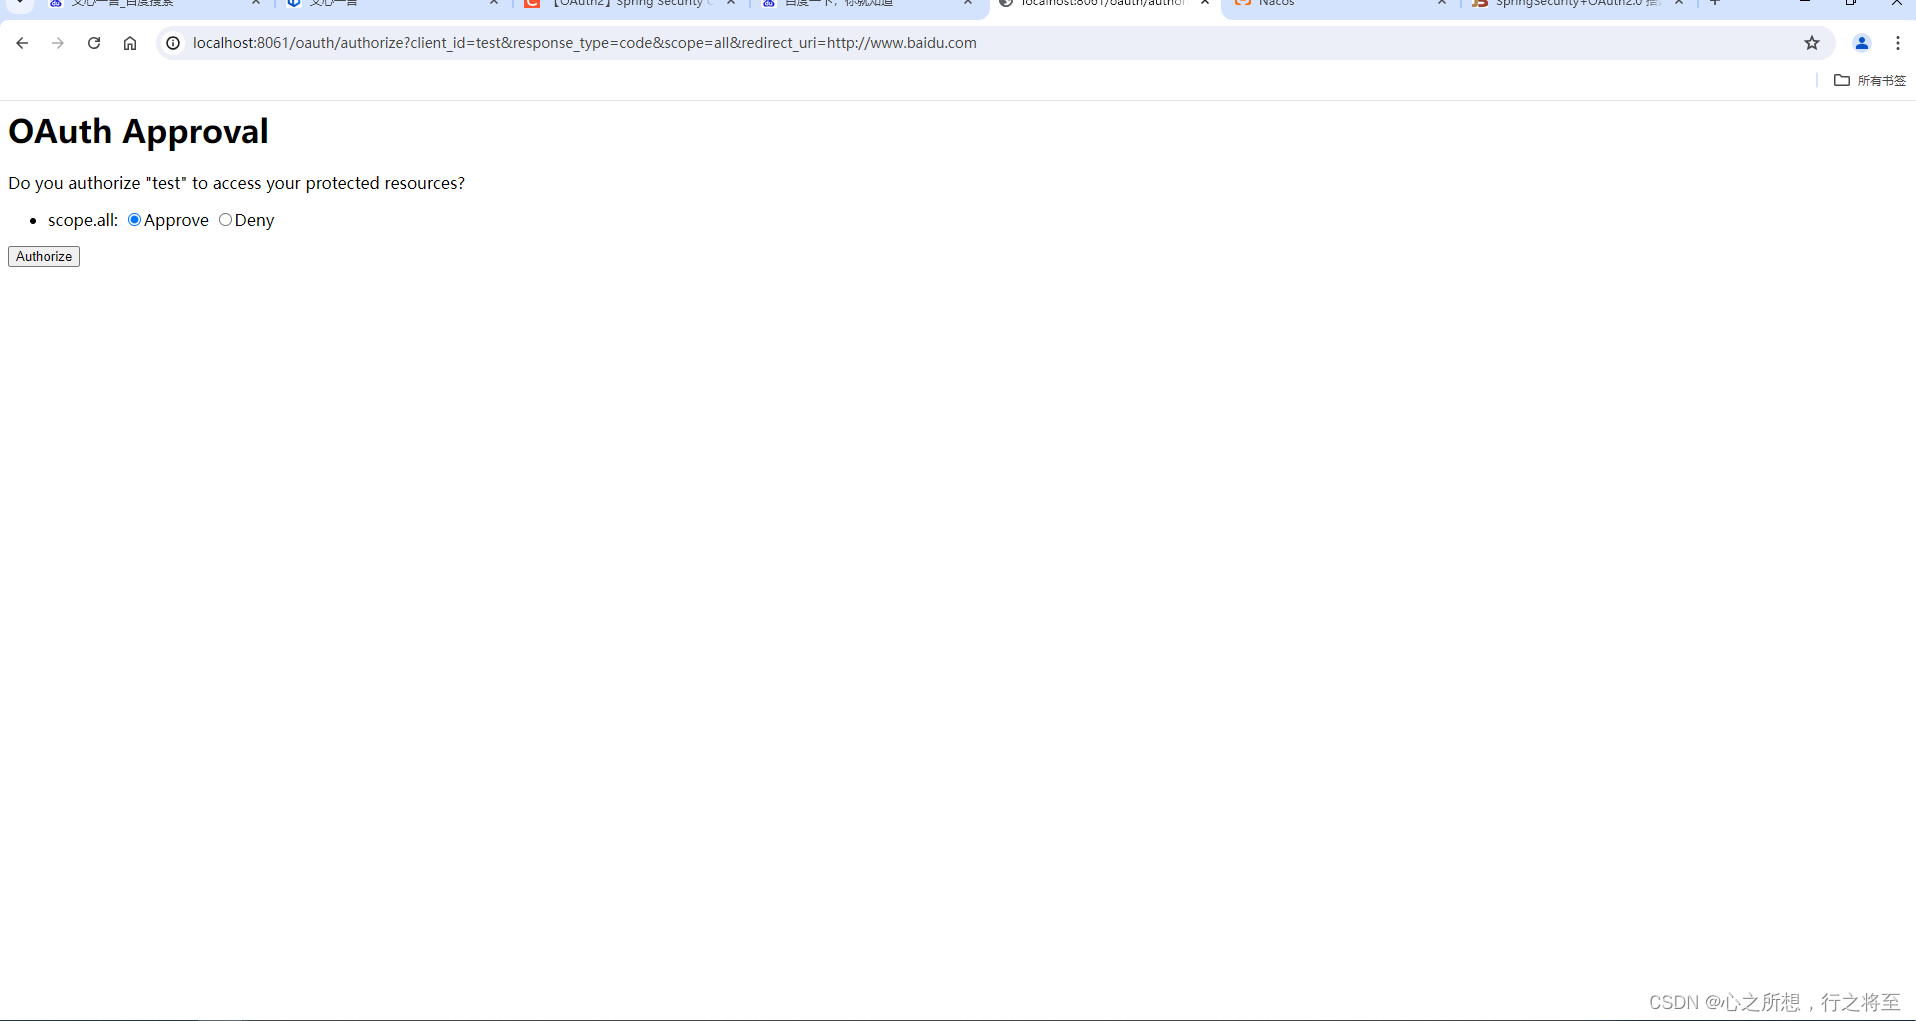
4.1获取到授权码:

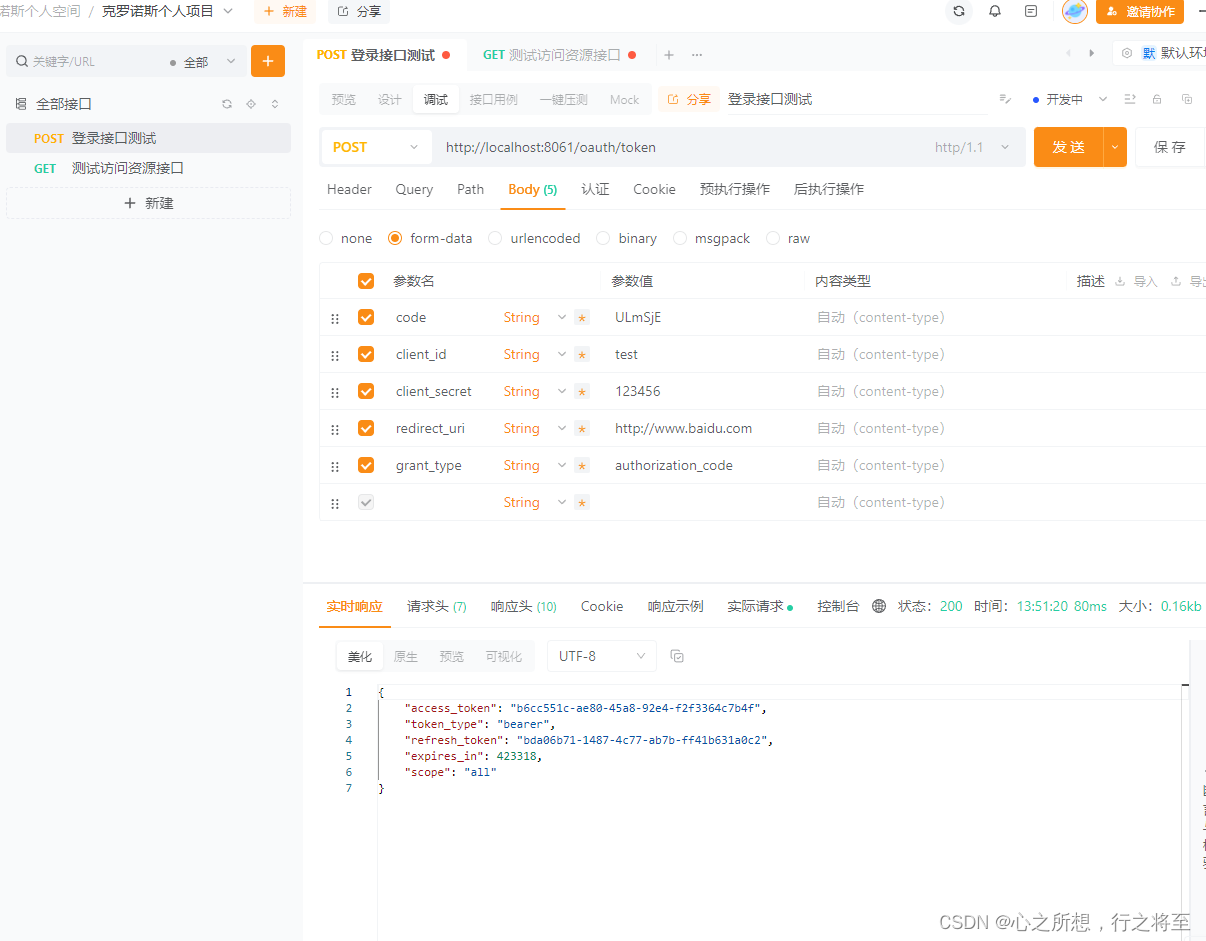
4.2 通过postman请求获取access_token
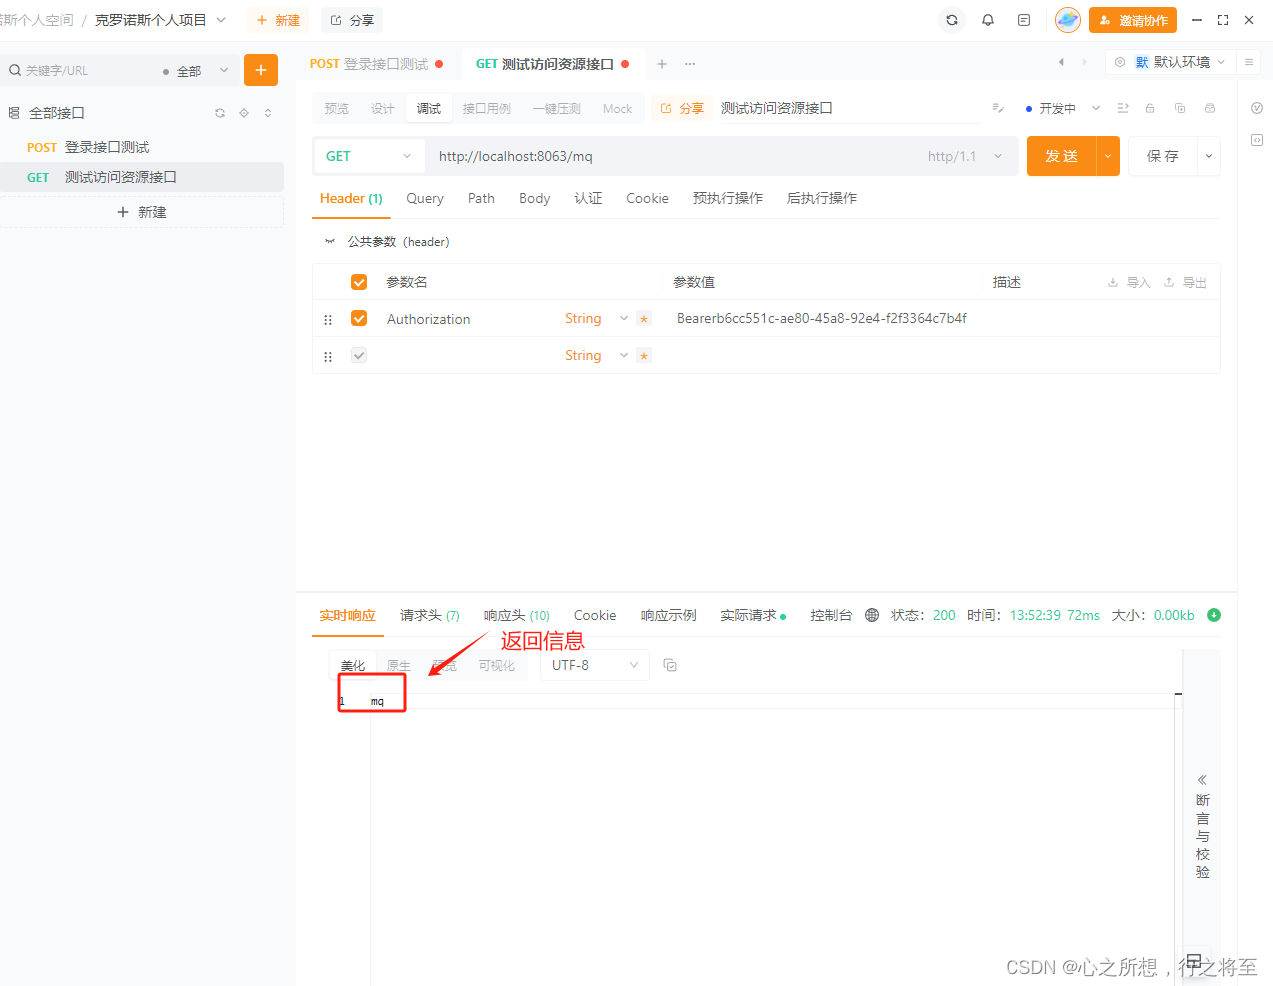
4.2测试通过access_token访问资源:
4.3 无token携带的时候,访问服务资源
4.4 在指定模块添加配置类(ResourceServerConfig):
package com.example.mq.config;


import org.springframework.context.annotation.Bean;
import org.springframework.context.annotation.Configuration;
import org.springframework.security.config.annotation.web.builders.HttpSecurity;
import org.springframework.security.oauth2.config.annotation.web.configuration.EnableResourceServer;
import org.springframework.security.oauth2.config.annotation.web.configuration.ResourceServerConfigurerAdapter;
import org.springframework.security.oauth2.config.annotation.web.configurers.ResourceServerSecurityConfigurer;
import org.springframework.security.oauth2.provider.token.RemoteTokenServices;

@Configuration
@EnableResourceServer
public class ResourceServerConfig extends ResourceServerConfigurerAdapter {

    @Bean
    public RemoteTokenServices tokenServices(){

        RemoteTokenServices tokenServices = new RemoteTokenServices();
        tokenServices.setCheckTokenEndpointUrl("http://localhost:8061/oauth/check_token");
        tokenServices.setClientId("test");
        tokenServices.setClientSecret("123456");
        return tokenServices;
    }

    @Override
    public void configure(ResourceServerSecurityConfigurer resources) throws Exception {
       resources.resourceId("mq")
               .tokenServices(tokenServices());
    }

    @Override
    public void configure(HttpSecurity http) throws Exception {
      http.authorizeRequests()
              .antMatchers("/**")
              .access("#oauth2.hasScope('all')")
              .anyRequest()
              .authenticated();
    }
}
5.nacos相关配置,以及服务注册情况
5.1nacos配置显示:
5.2 nacos上服务显示:
通过以上配置完成微服务框架的简单auth2.0授权配置。